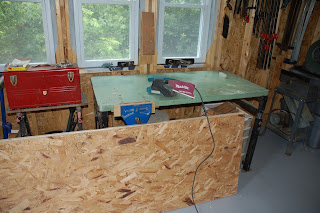
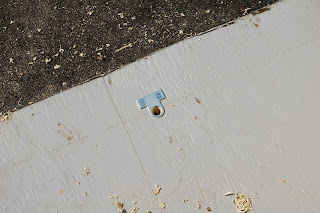
After leaving the glue to dry over night, it was time to true them up a bit. I broke out the Makita belt sander and I put the door on its edge.
I then marked the edge of the sheathing that I was going to true to. It just happens that I used the plywood on one door as my guide and the OSB as the guide on the other. Both have the same dimensions, it just worked out easier that way.
The black line that looks like a big void in the plywood is marker.....not a void. I sanded and sanded and sanded some more until I had both doors matched. At one point I thought it would be a lot faster if I just used a plane, and right then found a staple in the wood.....keep sanding.
Once I was satisfied (or tired of sanding) that they were close enough, I laid them on the floor to check the pair of them were square. Top width OK, bottom width the same, diagonals are the same...good to go.
You can see in the background I have a sheet of OSB screwed over the doorway, keeping the rain out.
So now it's time to make the frame.
I like the fence I built for the table saw. It is a piece of aluminium extrusion with T-slots in it. I have a piece of ash that I use for a sacrificial fence/tall fence. It is so easy to change in and out.
I laid out the large rebate (rabbit) on a scrap piece and made a test cut on it. The old saw protested and groaned, but with some gentle persuading made the first deep cut through 2 8' 2 x 4's (that is hard to read....two, eight foot, two by fours), and one shorter one.
Then it happily chewed through the shallower cut to complete the profile.
After that, I put the parts over the doors to get a true measurement of the top rail. Once that was done and marked out, it was just a matter of cutting it to length and then nibbling away where the sides meet it.
Check again. It consumes a lot of my time checking and rechecking things, I still make mistakes, but not this time.
I am happy with the fit. Glue the joints and a couple of 3 1/2" deck screws secures it and then I add a temporary brace and 2x4 spacer to the bottom to keep the fit right.
Then it's time to flip it all over, the 2x4 spacer keeps the middle of the doors up and the rebates do the edges and the top. I walked over it many times like this and it is good and rigid.
Time to cut the mortices for the hinges. I am using 3 on each door. I picked up these commercial style hinges at a yard sale for $5
They are not all exactly the same, so I had to keep track of which one went where. I used the hinge itself as a guide. The top one 8" from the top, the bottom one 9" from the bottom and one in the middle.
I cut the mortices in the door with my Dremel rotary tool with the router attachment. Putting the springs on the top so it works as a fixed base. With the springs below, it is a plunge router.
With it being a cloudy rainy day, I had to figure out a quick way to get some task lighting.
The dremel would not reach on the frame, so I did those the old fashioned way, with a mallet and chisel.
That pretty much ate up my day.
I had to go to the hardware store to get screws for the hinges. Everything I had on hand was too small. I think the #12 x 3" ought to hold the weight. I got some shorter ones too....lol.
So, once all the hinges are installed, I check again, and have to so a bit of trimming. A little bit more on the outside than the inside on the edge to account for the arc in the swing of the door.
I get that all working nice and now I have to take the doors off and install the frame. I measured the opening and it is 1 1/2" wider than the door frame, so on one side I just put some 1x4 in where the hinges are positioned to act as a spacer. I checked to make sure, and the rough frame is plumb in both directions.
Then some more 3" #12 screws into 2 of the holes of each hinge, through the spacer, and into the rough framing.
With that side done and secured, I put the doors back on. On the other side I put a couple of scrap pieces so the frame would line up flush with the inside.
Then it was just a matter of putting some cedar shims in behind each hinge, take out 2 of the shorter screws in each, and replace them with more of the 3" screws. Through the hinge hole, through the frame, the shim and into the rough framing, and it works!!
I can now take the brace and spacer off of the outside.
Almost fully functional, all they need is a bit more hardware. On the door that will be closed most of the time that means a couple of big sliding bolts on the inside. On the top I put in some blocking on screwed into the door frame and also the lintel.
Another one just like it on the bottom of the door. Remember that big block of wood I put in the floor framing for just this purpose?
I will use the other door the most, it gets a passage set. 34" from the floor, I strike a line on the door and bore into the edge with a 1" forstner bit.
Some folks like to bore the big hole through the door first, but I find this way you avoid all the break out when you punch through. My hole saw does not cut deep enough even going from each side, so I finished it with the jig saw. A simple matter of following the insructions (yes, some of us read them) and putting a hole and a strike plate in the other door now.
It works great!
I am going to put a lathe on the "fixed" door for the main door to close against at the seam. I also have weather stripping, a threshold and door sweeps to put on the bottom of the doors. I am also thinking a few fake battens on the door would look good too. I will fill the gaps with the same 7/16 OSB that is on the rest of the exterior, cover it with typar too.
I am also keeping an eye out whenever I go into a store for some mistinted exterior paint for the door. I will put on all the weather stripping and stuff after I get them painted. Not sure what colour they will be, but I hope I find something unique.
So, whew, a lot of work to get the doors in, and 3 days at it too. Mind you I didn't work fast, and took time off to watch some car shows and racing. Still, a lot of work.
I am now where I started, a shed (now referred to as the shop), but better protected against the elements and larger. The doors were the final step in that process, and even with the gaps around the doors, it is still more weather resistant than the old shed I started with. I still have a ton of moving things around and organising, or reorganising I should say. I am close to being content where things landed, but it still needs some tweaking. I still have to put my planes and chisel and stuff up, and have to move the tool chest out there (it has been sitting in out entrance way for almost 10 years, Sally will be glad to have it out of the house). I am going to pick away at a few odd jobs over the next while, so there won't be much exciting happening. I also have to go on a quest for an electrician, the guy I had in mind no longer does side jobs. I have almost all I need for the electrical (including the 60A breaker to go in the house to feed it) except the feed wire and conduit, oh, and a ditch, I need a ditch to bury the cable (I wonder if an overhead feed would be better?). So, until next time!
Thanks for dropping by!


