I showed in the last video about bookmatching the panels for the top and bottom of the box. I decided to get the joinery on the sides done up, and that went relatively smooth. I do all the testing on cut off pieces just to make sure and once satisfied, I milled up the box joints on the sides. They fit together well and I was satisfied.
Once that was done it was time to make the grooves for the bottom panel to fit into. I decided about the only way I had to do this effectively was to use the Router. It is not so great of a router, an old Craftsman that I got from my Dad with a bunch of bits. It must be about 30 years old, with a single speed and a 1/4" collet. I did have a 1/4" straight bit, so I put that in and tried on some off cuts to test the set up. That did not go so well. The old bit gave up the ghost and a small piece of the carbide chipped off.
I looked on line at my local hardware store and figured it would cost just under $30 to get a new one made by Freud. I like their products. I went today to see if it was in stock, and it was not. So I ended up buying a set of the store brand bits for about $50. A bit more expensive and not the brand I really wanted, but I would guess that a few more of the ones I have need replacing too. One thing about sets of router bits is that you usually get only a couple you will use and the rest sit in the box. This set are all pretty commonly used ones, and the only way that I could get the bit I needed today. Once I got it all set up it went pretty good. I had to do some minor clean up with the chisels, but that was expected.
Then it was on to fitting the panel. I cut it to size, allowing that it had to fit into the slot. I then got my Record 078 and put a rebate (rabbet) all the way around the panel. It was a bit of a chore, but an enjoyable one. It will take some time to get used to the tool, but I will keep practising.
With the milling done I tested the fit and it all seemed to be good. So the next step is to put some finish on the panel. It may seem premature at first, but the wood will move with the seasons, getting wider and narrower with humidity changes, and if I waited until it was together, I would not be able to get the finish to the edge and that edge would show as it moved in the slot.
I decided I would try a new to me process. I mixed 3 parts of boiled linseed oil (BLO) and 1 part bees wax while on a small heating unit. Upon applying it to the wood the grain popped out and it took a wonderful colour.
I may have found my favourite finish. It has a wonderful sheen to it too.
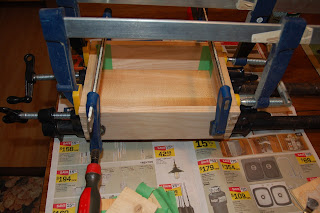
With that done it was time to glue up the panels. I really need a better clamping solution, but as I write, it is sitting on the kitchen table drying.
The top of the box will be just the same, only larger so as to slip over the bottom. You may notice the painters tape in the corners to catch the squeeze out and make clean up easier. So now I have to make the mate to this piece, following the same procedure. Hopefully a little more efficient and in better time.
Thanks for dropping by.


No comments:
Post a Comment