Sunday, February 15, 2015

A real wood working project

Are we back on track now?.........................


I didn't even know there was a track................

Welcome back reader!  On the little trip I am taking down memory lane we now come to 2009 and something I have wanted to try for a long time.  Remember the logo?  This is the build of the guitar that spawned the Watertone name and the loon that goes with it (the loon on the logo, not the one writing this story).

The story actually started about 4 years earlier when I cut down an ash tree on our yard and sent the bottom 6 feet to a guy down the road to get milled into 5/4 stock.  After 4 years of drying in several variations of tarp shed it was time to get some use out of it.  I had recently gained possession of a Makita 300 mm thickness planer at no cost (my favourite price).  So that seemed like the place to start.  A bit chilly in April but we got the wood all put through the planer and disposed of the chips with my high tech dust collection system.


The weird thing about this machine is that the power head is stationary while the table moves up and down.  Not the best thought out system, but like I said, free.
Soon I had a nice little pile of ash boards that I stacked in the front room.


I made myself a router template by tracing around my Squier Strat.  Then I modified it a little to suit my tastes and for my goals for this build.  A hard tail (non-trem) semi hollow strat.  From that stack of boards I found 2 of them that were cut off the log one right after the other so they had a good grain match.


and I cut out the section I liked


Now these 2 boards are not going together like shown.  They are a book match from being cut from consecutive layers in the tree, but they are much too thick at 3/4".  Instead, each board gets resawn again and book matched, one becoming the top, the other becoming the matching back.  My first go at a book match, so I might as well try to make 2 of them the same.

I then got help resawing, thickness sanding, and getting a maple core for the build.  A big thank you to Mike Newsom who I met through the Canadian Guitar Forum and spent a day with me in his shop getting things done.  Mike is a heck of a nice guy and makes beautiful guitars Newsom guitars .  He also gave me a hand attaching the neck and lots of advice too.  Oh, and a really good spaghetti dinner on top of that.  

So, now that I have some thin, book matched panels, I had to edge glue them.  I took a board and pounded some nails into it so that when the panels were pushed flat between the nails it made significant clamping pressure.  Then waxed the centre of the board so my panels would not stick to it.  Glued up the panels and clamped them between the nails.


I also rough cut the maple core for the body. 


A bit of trimming with the template and the router and I had the core done.  With a back, a front and a core, I could now start to assemble the body.  I first glued the back to the core.


I used plenty of cauls when I glued it up and it came out pretty good.


It even kinda looks like a guitar from the back.


I figured that I would need a way to get the electronics in there, so the next job was to make an access panel.  I cut out what I thought was a good size and shape.  Then I found a cut off that the grain matched fairly well to make the cover.


This all took place over 5 weeks or so.  It was not a fast process.  I did the top in much the same way and got it glued on to the core too.  I have to say that I really learned the importance of keeping a centre line.

  I was not building a neck for this project.  I thought there were enough challenges for a first guitar build as it was.  There were a lot of firsts in this project.  Popping grain by using ebony aniline dye (water based, from Lee Valley) and then using an antique amber on it to get the colour I wanted.  Then my first effort at French Polishing.  De-waxed shellac is hard to find in these parts.  I ended up ordering from some great folks in Saskatoon Saskatchewan (always seems like cussing when I say that name).  They mailed me some super blonde shellac that came within a couple days of ordering.  Woodessence has a bunch really nice finishing stuff they sell.  I have to give a shout out to a You Tuber who I watched over and over again to get his method of French Polishing. Steve's Guitar Making , his instructions were so helpful in this project!  

So, by the middle of July we have made it to this stage


A really good spit coat and the grain filled.  Not finished yet, but some protection on it.  The holes were drilled by making a template from some scrap aluminium I had laying around.


By August I had the neck that I had ordered.  It is an Allparts SMO-FAT, which is about the biggest neck I could find.  I wanted a big profile, a maple fretboard, and the original small fender style headstock.  The headstock got the same french polish as the body.  I made the logo on water transfer stock that can be used in an inkjet printer and buried it between several coats of shellac.  The rest of the neck was finished in Birchwood Casey Tru-Oil, a gunstock finish that is nice to work with and gives a tough finish.  I spent weeks polishing on the guitar, I would sit in front of the TV with the guitar on my lap and apply coat after coat, sanding back to level everything out and using 4F pumice to fill the grain.  Every night I would hang it and let it dry.


By September the dry wall was put up in that room and I could no longer make a mess in there.  The guitar got treated pretty well though.


That is the Squier in the photo that I made the template from.  It is a Korean made unit from the Cort factory.  It is a Pro Tone model, which are well made and sought after.  It is no longer mine though, I did sell it, also the Peavey Classic 30 is gone now.  30 watts of tube power is way too loud for most rooms.

By October I had the neck routed with a jig I made directly from the neck itself.  It worked out very well, holding together by friction alone when I was done.


The jig was made by taking a section out of a piece of plywood, putting the neck in the space, then butting lexan right up to the neck in order to make another template for the router.


Again, the centre line goes on everything.  The next job was to install the bridge.  More careful measuring and honouring the centre line.


I decided to go the string through body route so I drilled the holes through the body (taking power tools to something with finish on it is nerve racking) by chucking the bit in a Dremel and using a plunge router base for it to make the holes go in straight.  They lined up pretty good.  Note the metallic shielding tape inside the control cavity.


That was pretty much it for 2009.  Work on the guitar stopped for the winter.  Not to be on the go again until the next summer.  I needed to wait for the budget to recover to get some parts, so the project went into limbo for a bit.  The other thing I started to do was to start tearing apart my table saw.  I got it from my dad that summer (my favourite price again) but it needed some TLC.  It is a 1972 Craftsman direct drive.


The top had sagged a bit over the years  (We all start to sag a bit when we are getting close to 40 years old).


We will see how that gets fixed next time when we get to 2010.  Along with more tools and more guitar building. 

Thanks for stopping by!

Sunday, February 08, 2015

Let's keep all of this dry now

Hello and welcome back.

Our little adventure now brings us to 2008.

Yes there was a 2007 in there, but nothing much happened to the home that year.  It was the year I had a career ending injury to my knee, tearing the miniscus and having a DVT develop.  The DVT required blood thinners which delayed surgery.  When I did eventually get the surgery it made things worse.  So now I have chronic pain and phlebitus for which I need a compression stocking to keep the blood flowing.  There is enough damage that I cannot balance on that leg alone with my eyes closed.  The signals don't move fast enough.  The injury also caused some other issues with my difficulty in accepting the situation and circumstances.  I still have days when I struggle with it.  I don't really like talking about it.  I used to run CNC machine cells that cost millions of dollars, now I can't get a job at the corner self serve gas station.  It gets to you some days.

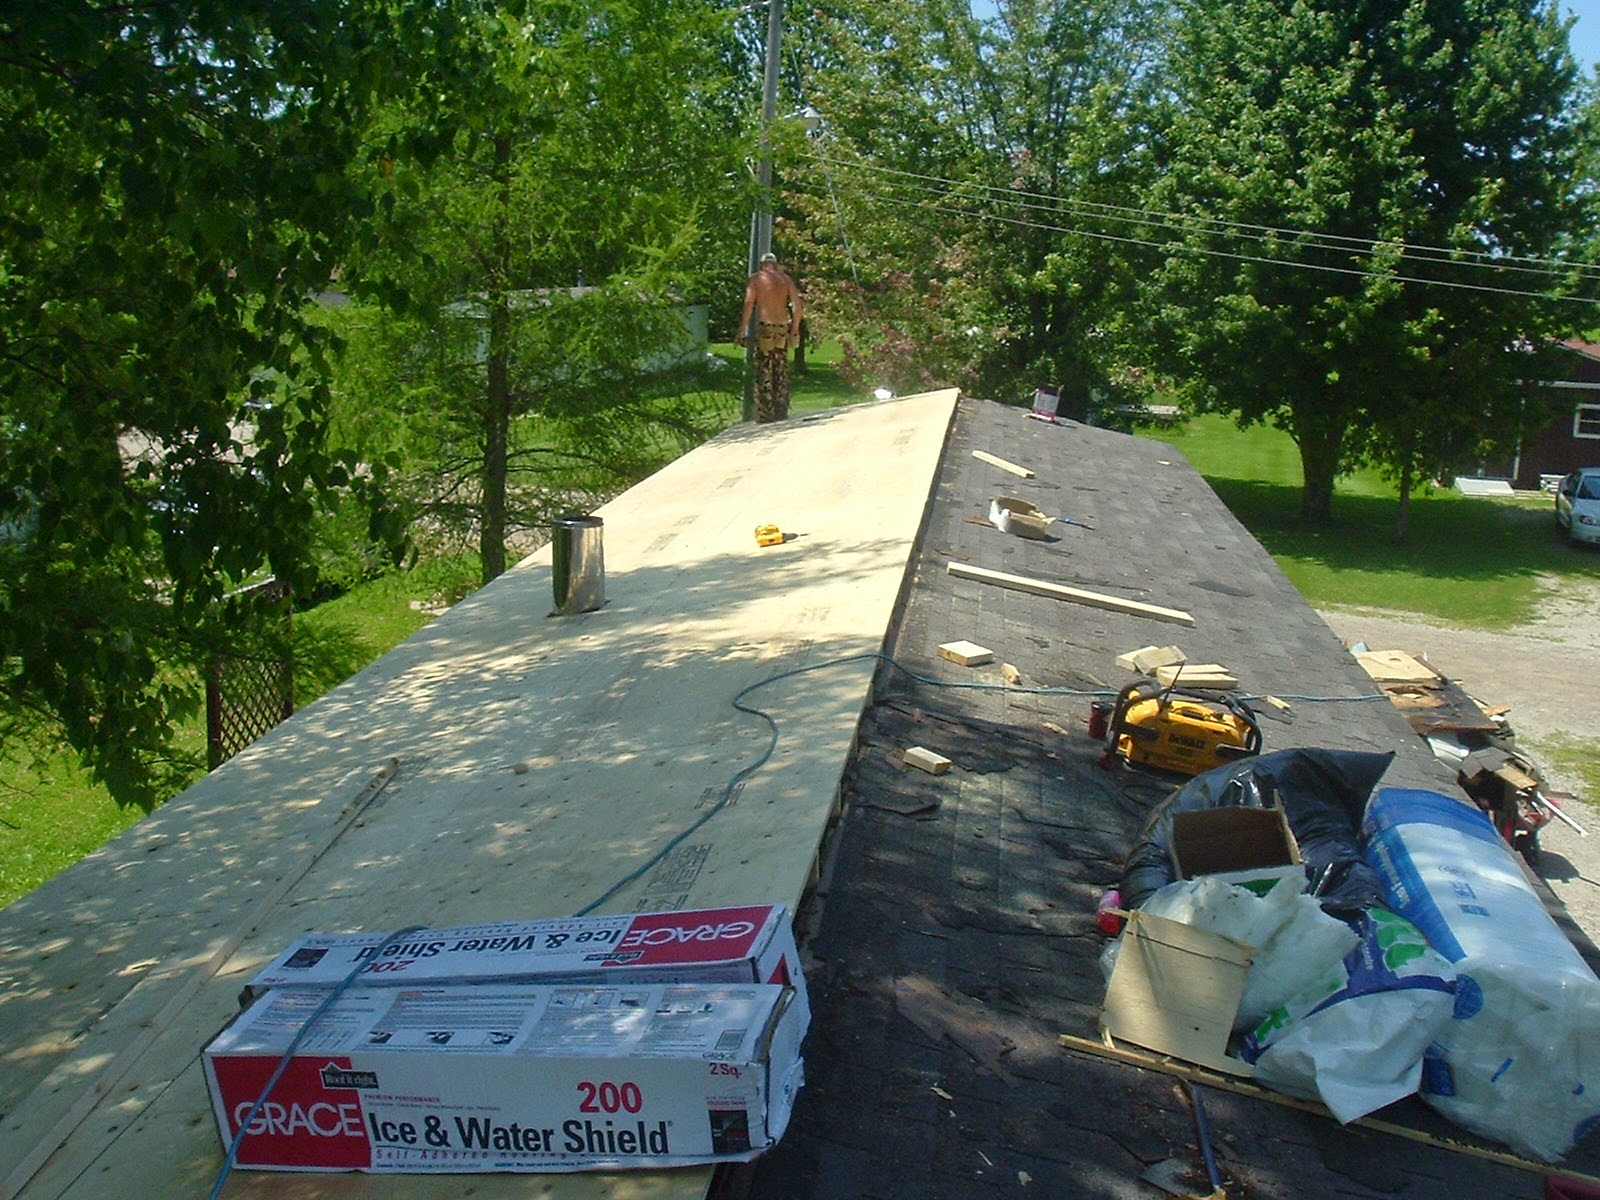
So 2008 we figured it was time to get the new roof on the place.  A lot of work had been put into it and we did not want to risk any water damage.  When I fixed the roof over the bathroom I found that the trusses were set 24" O.C. and were covered with 1/2" OSB with H clips between them.  Within code, but it sure was a bit springy to walk on.  The insulation was OK, but was suffering from a lack of venting above it.  I intended to fix all that, and have the new roof built my way.  I had to hire out the job, and a young fellow and his crew showed up on time and started peeling away the old roof.  The plan of attack was to re structure one side one day, the other half the next day and shingle on the third.  Off to work they went.


Once the side was stripped back I had them attach a 2 x 4, on edge, to the top of each truss.  This gives me a nice airspace above the insulation and also lets me widen the eaves on the house.


Once that was done it was sheathed with 5/8 T&G plywood.


Much stronger and better designed.  After the plywood was down I had them cover it totally with Grace brand ice and water sheild.


Once both sides were done, it was time for shingles.  Overnight before the 3rd day (shingling day) we had some rain, and apart from a little around the chimney, we had no water get in.  We were waterproof before the shingles.  We selected a green architectural shingle designed to tolerate the low slope of our roof and the lads were soon at it.


A gap was left at the peak for the ridge vent.


Then capped with consideration for the prevailing wind.  A solid, well designed roof if I do say so myself.  It was 3 hot days these guys put in.  They arrived promptly at 8 in the morning and off to their families at 5 in the evening.  They kept the workplace clean and tidy and did a good job.  Now, I like to think I treated them well with an unlimited supply of ice cold bottled water, or iced tea or soft drinks which were offered, but they stuck to the water.  At noon Sally and I would make up a big tray of buns with cold cuts and sandwich items like tomatoes, cheese, lettuce, etc. and a pitcher of iced tea.  At the end of the day we would treat them to a beer to end the day and have a kind of a wrap up meeting.  Over all we are well pleased with the job.  Aggie seemed OK with it too.


But for the most part, just relaxed under the tree in the shade.


So, that was the house jobs for 2008.  It really wasn't completed until 2014 as the aluminium fascia went on that year.  Up until then the fascia was just painted.   I guess I have to start looking through pictures to see what the next instalment will bring.  

Thanks for stopping in!


Sunday, February 01, 2015

Another year, another section of wall comes out

Hi there!

If you are following along, you know I am taking a bit of a look back at our home and getting used to writing while I am waiting for spring and the shop build.  So now I am going to tell you about all the fun we had in 2006.

A small dark spot appeared on the ceiling of our en-suite bathroom.  It is a nice sized room, about 9 x 13 and I had done a bit of work in there already.  I removed the round tub that was in there.  It was a terrible cheesy plastic thing.  I also replaced the shower stall.  The tenants that were in the home previously had used the shower despite the pan having a huge crack in it.  Needless to say, the particle board floors did not like it and had to have a section replaced.  I did that with plywood. I also moved the stacked washer/dryer in there.  But now, this dark spot and a bit of a musty smell.....start digging I guess.  Take off a bit of drywall, remove the insulation....


OK, that is kind of bad


Down below is not that great either.  There is water getting in somewhere, I guess we gotta take a look.  So we peel back a bit more, and when we open up the ceiling and see the roof sheathing, we find....


Now, this is getting to be a bigger issue than I was expecting.  How far did I have to go?  Well, by the time day 2 of ripping things apart came around I had half the ceiling and the whole south wall of the bathroom stripped of dry wall and insulation.  


No sense treating the symptoms and not addressing the disease.  The water got in through the roof.


Yee haa!  We're having fun now! 


Note that despite being a mobile home, it has a regular trussed roof with a peak and shingles.  That and the 2 x 6 wall construction make this more like a framed home than a mobile home.  You can see in the picture of the roof the vent stack.  That is inside the bathroom wall, so I had to rip off a bit that was into the bedroom.  I think in all I peeled away a 4' x 10' section of roof, 9 running feet of wall, and a 2' x 6' section of floor.  I removed the window in the bathroom while I was re-framing too.

Anyone who has ever worked on a home knows the great feeling of starting to put things back together.  My son came over and helped out lugging stuff and pounding nails.  We soon had some sheathing up.


put some shingles on


Add a new vent


Closed in again.  I did the OSB and exotherm on the walls again, put on some siding that matched the front, and some tidying up.

Wait...

Did you catch it?

What a poor way to do shingles....not even felt paper underneath....why oh why would anyone do a poor job on their house?  Well, the short answer is, because it is temporary.  The roof is already scheduled for re shingling (and much more as it turns out, but that is another story to stay tuned for), so I was not too concerned about the longevity of my work at this point.  It was about this time I found the spot I like to work at, or, up until now, the "shop".


So we had a functioning, enclosed en-suite bathroom again.  The cause of all of the leaking was a branch from a birch tree falling and damaging the roof.  As I write this on the first of February 2015, a piece of that very same tree is heating my house.  Which brings us to one our favourite renovations.  The wood stove.

We heat our home really inexpensively with our wood stove.  We heat it if the power goes out too.  

We started out by screwing and glueing down a layer of 3/4" construction plywood with the rough side up on top of the existing 5/8" particle board giving us a nice stable surface 5' x 6' for the stove to sit on.  We had gone to Home Depot and they had nice slate tile that was inexpensive.  We were told that people generally liked the solid colour ones.  We were of the exact opposite opinion, preferring the multi coloured and mottled ones.  So we opened box after box of slate tile right on the floor of Home Depot picking out all the "ugly" tiles, and putting all the solid colour ones together and back on the shelves.  We bought a couple of extra. 


I can't remember what the adhesive was I used.  I just bought what they told me to and followed the instructions.  There are modified and unmodified mortars and different grouts.  I went to a near by Rona (a Canadian chain of independently owned lumber/building/hardware store) and told them what the project was and they steered me in the right direction.  They knew what size notch the trowel needed too.  I had never tiled before, but I think it came out OK.  The slate varies in thickness, so it is not a perfect flat surface.  It has the slightly rustic look that we like.  We keep saying we don't need a cottage because we live in one.  So, I got the floor all ready with a nice big surface, nice to put a wood stove on.


Wow, that carpet is ugly...glad it's gone now.

Then it was a hole in the roof


a bit of framing


cut the rest of the way through


add the thimble, the chimney pipe and adapter goes into this from the outside.


Then with a simple expanding section, hook the stove to the chimney


As soon as it was all hooked up and the flashing installed, we called to have it inspected and the building permit signed off.


Oh, I guess I should have mentioned that earlier.....the first thing we did was get a building permit.  The stove is a Drolet Legend and is rated for mobile home use.  It takes the air it uses for combustion from outside.  The chimney is from Security Chimney.  Both companies are located in Quebec and I bought all of it from Rona.  I don't think they carry the same brand chimney any more.

So that was 2006.  Inching towards moulding the home to our lives and learning as we go. Time for a nap.


Thanks for stopping by!