Thanks for dropping in!
Sunday, August 23, 2015
Shop Tour Video
I finally got it done. Here is the shop tour video on how things stand today. I miss named a few things (file card for one) but I don't do much editing and publish pretty raw footage. I am not a computer wiz so I try to keep it simple. I hope you find it entertaining. Remember "thumbs up", "likes" and "sharing" helps spread it around and indicates to me that I am on the right track. I will answer comments as soon as I can.
Thanks for dropping in!
Thanks for dropping in!

Monday, August 17, 2015
Let there be light!
Hello! Welcome back.
I has been a little time since a post and another small step has been taken. I have the electric work on hold for now due to budget issues, but a temporary solution will help out.
The used florescent units I bought, hoping to get a good bang for the buck, were a bust. All the ballasts were bad. I had to go out and buy new light units. The ballast replacements would have cost more than these lights.
One thing I do not like about these lights is that they require a junction box. Most florescent lights I have worked with have the wire going right into the unit and no box is needed. Of course I only realized this after I got home with the lights and figured I would put them up. Off to Home Hardware for some junction boxes. Now I am putting in a finished ceiling eventually and the boxes have tabs on them so they hang below the ceiling joists by 1/2" so they come through the finished ceiling. So I put some vapour barrier up around the boxes and hung them using the tabs as a guide.


I has been a little time since a post and another small step has been taken. I have the electric work on hold for now due to budget issues, but a temporary solution will help out.
The used florescent units I bought, hoping to get a good bang for the buck, were a bust. All the ballasts were bad. I had to go out and buy new light units. The ballast replacements would have cost more than these lights.
One thing I do not like about these lights is that they require a junction box. Most florescent lights I have worked with have the wire going right into the unit and no box is needed. Of course I only realized this after I got home with the lights and figured I would put them up. Off to Home Hardware for some junction boxes. Now I am putting in a finished ceiling eventually and the boxes have tabs on them so they hang below the ceiling joists by 1/2" so they come through the finished ceiling. So I put some vapour barrier up around the boxes and hung them using the tabs as a guide.


Since the lights are flush mount I have a 1/2" discrepancy in level now, right in the middle of the light where the wires come through the box. Also, the holes for mounting don't line up with anything. To solve this I ripped some 1/2" plywood, 6 inches wide, and cut them to 16 inches in length. I spanned two rafters and screwed them in place. Now everything is level.

The lights are nice and solid on the ceiling now.

The wiring was pretty straight forward from there. I make it a habit of securing the green/bare earth wires first and making sure they are solid. I really dislike that these lights have no physical connection between the junction box and the light unit. So I made sure to add a wire to electrically connect the box to the earth wire so it is grounded. I ran the wires to each light and then to the wall switch. From the wall switch I just put in a pigtail to a plug. I didn't take any photo's of the actual wiring. If you know how to do it, you know. If you are not familiar with wiring, call an electrician. I am not a pro, nor is this meant to be instructional, so if you go messing around with electricity and get zapped, it's your own fault.
That being said, I think the results were well worth the effort.
This should get me through for a while. At least until the days start getting longer in the spring and I can start trenching in the permanent electrical.
Now I can start thinking about making a shop tour video. Looks like this heat wave is going to break soon into a couple of rainy days. After that, and some clean up, I can do the video. Until then though, I am going to the pool.
Thanks for dropping by!
Wednesday, August 12, 2015
Outside is DONE!
Whew, I mean really, that took a long time!
The outside is done though. Well, I have to finish up a bit of caulking. I ran out. Between rainy days, the yard sale (which was a flop), running out of stain, and regular life, I finally had enough and put my nose to the grind stone, and did it.
Oh, I was short on stain for the second coat too......I was one 4' width short, and it is going to stay that way. It is on the north side where the bank of windows is, and does not show up that much, or get much viewing. The shop is a little darker than I would like, but by next year it ought to be just right. The spruce I made the trim out of took the stain a bit different than the plywood siding, but over time should mellow too.
So, the pictures.
The front with the entrance, I like the contrast with the green and white.


The outside is done though. Well, I have to finish up a bit of caulking. I ran out. Between rainy days, the yard sale (which was a flop), running out of stain, and regular life, I finally had enough and put my nose to the grind stone, and did it.
Oh, I was short on stain for the second coat too......I was one 4' width short, and it is going to stay that way. It is on the north side where the bank of windows is, and does not show up that much, or get much viewing. The shop is a little darker than I would like, but by next year it ought to be just right. The spruce I made the trim out of took the stain a bit different than the plywood siding, but over time should mellow too.
So, the pictures.
The front with the entrance, I like the contrast with the green and white.

When I was doing the frieze boards, I could not picture myself, up a ladder, with an almost 8' piece of wood, trying to get a good fit at the peak. So I copied the keystone feature at the peak and that made it a lot easier.

Moving to the right is the pretty much featureless south wall. This is going to be a good place for some planter boxes to maybe grow some peas and green beans and some other things that grow on the vine.

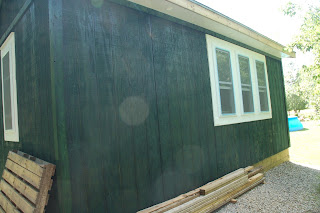
Going right again to the east wall (they are not quite in the cardinal directions) we see the back of the shop with the single window (and a pallet leaning against it).

Again, I did a keystone on the frieze board, but on this end not on the fascia board. This is around back and not viewed much.
The last side is difficult to get a good picture of as you cannot stand back very far. But at an angle it looks like this.

The boards on the ground are stored there and are for stacking firewood on. The firewood presently sits on our little ground level deck and should be gone by next spring. You can barely make out that the last section (farthest away) did not get a second coat of stain.
I am so glad to be done the outside. I was a huge job. On the entrance side and south side the second coat got put on with a brush, and that was more work than I expected. Going up and down the ladder made it so I had to take days off to recover. I broke down and bought a high pile roller refill to finish it off. The weather stripping is all installed around the door, and of course, I bought that before I got the stain and bought brown, where white would have been better, but it is functional. The only thing is, I can no longer sneak my extension cord under the door now.
I tried a bit of work on the electrical, trying to get a temporary lighting solution, only the 3 florescent units I bought at the ReStore (two 4 tube fixtures and one 3 tube fixture) had bad ballasts and are way past the time allowed for returns, and I lost the receipt too. I checked the price of ballasts and they are too costly to replace. The 4 tube unit takes 2 ballasts and they are over $20 each and I can get a whole 2 tube unit for $25, and I did. I now have three 2 tube units to install and they don't line up with the wiring I put in for the others. So I have some work to do there. I was sure that I had some junction boxes on hand but I was wrong, so that is on the shopping list to get that going. Give me a little while to get that done, and a good cleaning up and I will be doing a shop tour video. I hope within the next week. I am not sure how much detail I will go into yet. I guess it will depend on my mood at the time. If I start getting lengthy I will split it up into parts and put them on You Tube that way. I don't know what everyone would be interested in seeing, but I think a single long video would be a bit boring. Even though my rafter build video has my greatest number of views being on the long side, I would like to keep the length of my videos down so people don't have to prop their eyelids open to stay awake through it. Besides, editing and stringing sections of them together are a bit of a challenge for my level of computer literacy.
I should point out that I am using a little Canon point and shoot for my videos. Part of the reason for me doing this is to show folks that you can put things out on a budget that are entertaining without the need to spend a lot of money. So I encourage you to find something you love doing as a hobby and make some content to share. I am influenced and subscribe to a great number of You Tube channels. I have mentioned some in the past, and will refer to them in the future. There is a great community of skilled people out there and I owe them all a debt of gratitude for what they produce and for getting me motivated to learn and explore and to build the Watertone Workshop. As for all who subscribe to this blog and watch my videos.......
Thanks for dropping by!
Subscribe to:
Posts (Atom)